搜索到
21
篇与
的结果
-
 python镜像源 python镜像源python镜像源清华:https://pypi.tuna.tsinghua.edu.cn/simple 阿里云:http://mirrors.aliyun.com/pypi/simple/ 中国科技大学 https://pypi.mirrors.ustc.edu.cn/simple/ 华中理工大学:http://pypi.hustunique.com/ 山东理工大学:http://pypi.sdutlinux.org/ 豆瓣:http://pypi.douban.com/simple/ python换源pip config set global.index-url https://pypi.tuna.tsinghua.edu.cn/simple/ 解决ModuleNotFoundError: No module named ‘pip‘问题python -m ensurepip python -m pip install --upgrade pip
 -
正则表达式语法 正则表达式语法正则的语法:使⽤元字符进⾏排列组合⽤来匹配字符串 在线测试正则 表达式https://tool.oschina.net/regex/元字符: 具有固定含义的特殊符号 常⽤元字符:. 匹配除换⾏符以外的任意字符, 未来在python的re模块中是⼀个坑. \w 匹配字⺟或数字或下划线 \s 匹配任意的空⽩符 \d 匹配数字 \n 匹配⼀个换⾏符 \t 匹配⼀个制表符 ^ 匹配字符串的开始 $ 匹配字符串的结尾 \W 匹配⾮字⺟或数字或下划线 \D 匹配⾮数字 \S 匹配⾮空⽩符 a|b 匹配字符a或字符b () 匹配括号内的表达式,也表示⼀个组 [...] 匹配字符组中的字符 [^...] 匹配除了字符组中字符的所有字符 量词: 控制前⾯的元字符出现的次数* 重复零次或更多次 + 重复⼀次或更多次 ? 重复零次或⼀次 {n} 重复n次 {n,} 重复n次或更多次 {n,m} 重复n到m次 贪婪匹配和惰性匹配.* 贪婪匹配, 尽可能多的去匹配结果 .*? 惰性匹配, 尽可能少的去匹配结果 -> 回溯
-
C#代码 C#代码C#时间戳转换using System; using System.Collections.Generic; using SpiderInterface; class LocoyCode{ /// <summary> /// 执行方法,不能修改类和方法名称。 /// </summary> /// <param name="content">标签内容</param> /// <param name="response">页面响应,包含了Url、原始Html等属性</param> /// <returns>返回处理后的标签内容</returns> public string Run(string content,ResponseEntry response){ //在这里编写处理代码 string timeStamp = content; //将内容标签的时间戳赋值给临时字符串变量 //创建字符串存储时间戳 DateTime newTime; //存放新的时间 DateTime dateTimeStart = TimeZone.CurrentTimeZone.ToLocalTime(new DateTime(1970, 1, 1)); //创建1970.1.1日期 long lTime = long.Parse(timeStamp + "0000000"); //现在时间戳加上起始为0000000的时间戳 TimeSpan toNow = new TimeSpan(lTime); //TimeSpan实例变量toNOW newTime = dateTimeStart.Add(toNow); //将起始时间戳加上现在的时间戳转化为正常时间 content = newTime.ToString("yyyy-MM-dd"); //将转化成正常的时间进行字符格式化 return content; } } 采集器处理代码将base64编码的装换为utf-8编码的内容using System; using System.Text; using System.Collections.Generic; using SpiderInterface; class LocoyCode{ /// <summary> /// 执行方法,不能修改类和方法名称。 /// </summary> /// <param name="content">标签内容</param> /// <param name="response">页面响应,包含了Url、原始Html等属性</param> /// <returns>返回处理后的标签内容</returns> public string Run(string content,ResponseEntry response){ //在这里编写处理代码 if(content.Length > 1000){ var a = Convert.FromBase64String(content); content = Encoding.UTF8.GetString(a); } return content; } } 时间转换处理using System; using System.Collections.Generic; using System.Text.RegularExpressions; using SpiderInterface; class LocoyCode{ /// <summary> /// 执行方法,不能修改类和方法名称。 /// </summary> /// <param name="content">标签内容</param> /// <param name="response">页面响应,包含了Url、原始Html等属性</param> /// <returns>返回处理后的标签内容</returns> static string OneBitNumberToChinese(string num){ string chineseStr = "123456789"; string numStr = "一二三四五六七八九"; string result = ""; int numIndex = numStr.IndexOf(num); if(numIndex>-1){ char[] chs = chineseStr.ToCharArray(); result = chs[numIndex].ToString(); } return result; } public string Run(string content,ResponseEntry response){ //在这里编写处理代码 string lastTime = ""; int intTime = 0; DateTime time; time = DateTime.Now; Regex regex = new Regex(@"^(\d{1,2})"); if (content.Contains("刚刚")){ lastTime = time.ToString("D"); }else if (content.Contains("分钟前")){ string num = regex.Match(content).Groups[0].Value; num = OneBitNumberToChinese(num); num = "-" + num; intTime = Convert.ToInt16(num); lastTime = time.AddMinutes(intTime).ToString("D"); }else if (content.Contains("小时前")){ string num = regex.Match(content).Groups[0].Value; num = OneBitNumberToChinese(num); num = "-" + num; intTime = Convert.ToInt16(num); lastTime = time.AddHours(intTime).ToString("D"); }else if (content.Contains("天前")){ string num = regex.Match(content).Groups[0].Value; num = OneBitNumberToChinese(num); num = "-" + num; intTime = Convert.ToInt16(num); lastTime = time.AddDays(intTime).ToString("D"); }else { lastTime = content; } return lastTime; } } C#时间格式转换(将几分钟、几小时、几天前、几个月前转换为正常时间)using System; using System.Collections.Generic; using System.Text.RegularExpressions; using SpiderInterface; class LocoyCode{ /// <summary> /// 执行方法,不能修改类和方法名称。 /// </summary> /// <param name="content">标签内容</param> /// <param name="response">页面响应,包含了Url、原始Html等属性</param> /// <returns>返回处理后的标签内容</returns> public string Run(string content,ResponseEntry response){ string lastTime = content ; int intTime = 0; DateTime time; time = DateTime.Now; Regex regex = new Regex(@"^(\d{1,2})"); if (content.Contains("小时") || content.Contains("分钟")){ lastTime = time.ToString("D"); }else if (content.Contains("天前")){ string num = regex.Match(content).Groups[0].Value; num = "-" + num; intTime = Convert.ToInt16(num); lastTime = time.AddDays(intTime).ToString("D"); }else if (content.Contains("月前")){ string num = regex.Match(content).Groups[0].Value; num = "-" + num; intTime = Convert.ToInt16(num) * 30; lastTime = time.AddDays(intTime).ToString("D"); } return lastTime; } } C#获取系统时间using System; using System.Collections.Generic; using SpiderInterface; class LocoyCode{ /// <summary> /// 执行方法,不能修改类和方法名称。 /// </summary> /// <param name="content">标签内容</param> /// <param name="response">页面响应,包含了Url、原始Html等属性</param> /// <returns>返回处理后的标签内容</returns> public string Run(string content,ResponseEntry response){ //在这里编写处理代码 if(content != ""){ return content; } string date = DateTime.Now.ToString(); return date; } } C#提取字符串中的日期并且格式化using System; using System.Collections.Generic; using SpiderInterface; class LocoyCode{ /// <summary> /// 执行方法,不能修改类和方法名称。 /// </summary> /// <param name="content">标签内容</param> /// <param name="response">页面响应,包含了Url、原始Html等属性</param> /// <returns>返回处理后的标签内容</returns> public string Run(string content,ResponseEntry response){ //在这里编写处理代码 string result = content.Substring(0, 4)+ "-" + content.Substring(4,2) + "-" + content.Substring(6,2); return result; } } 时间连接(如20210520)在一起的解决方法:usingSystem; usingSystem.Collections.Generic; usingSystem.Text.RegularExpressions; usingSpiderInterface; classLocoyCode{ ///<summary> ///执行方法,不能修改类和方法名称。 ///</summary> ///<paramname="content">标签内容</param> ///<paramname="response">页面响应,包含了Url、原始Html等属性</param> ///<returns>返回处理后的标签内容</returns> public string Run(string content,ResponseEntry response){ Regex regex = new Regex(@"^(\d{4})(\d{2})(\d{2})$"); string str1 = regex.Match(content).Groups[1].Value; string str2 = regex.Match(content).Groups[2].Value; string str3 = regex.Match(content).Groups[3].Value; string str = ""; str = str1 + "-" + str2 + "-" + str3; return str; } } 时间戳代码using System; using System.Collections.Generic; using SpiderInterface; class LocoyCode{ /// <summary> /// 执行方法,不能修改类和方法名称。 /// </summary> /// <param name="content">标签内容</param> /// <param name="response">页面响应,包含了Url、原始Html等属性</param> /// <returns>返回处理后的标签内容</returns> public string Run(string content,ResponseEntry response){ //在这里编写处理代码 string timeStamp = content; //将内容标签的时间戳赋值给临时字符串变量 //创建字符串存储时间戳 DateTime newTime; //存放新的时间 DateTime dateTimeStart = TimeZone.CurrentTimeZone.ToLocalTime(new DateTime(1970, 1, 1)); //创建1970.1.1日期 long lTime = long.Parse(timeStamp + "0000000"); //现在时间戳加上起始为0000000的时间戳 TimeSpan toNow = new TimeSpan(lTime); //TimeSpan实例变量toNOW newTime = dateTimeStart.Add(toNow); //将起始时间戳加上现在的时间戳转化为正常时间 content = newTime.ToString("yyyy-MM-dd HH:mm:ss"); //将转化成正常的时间进行字符格式化 return content; } } 内容长度处理using System; using System.Text.RegularExpressions; using System.Collections.Generic; using SpiderInterface; class LocoyCode{ /// <summary> /// 执行方法,不能修改类和方法名称。 /// </summary> /// <param name="content">标签内容</param> /// <param name="response">页面响应,包含了Url、原始Html等属性</param> /// <returns>返回处理后的标签内容</returns> public string Run(string content,ResponseEntry response){ //在这里编写处理代码 string text = Regex.Replace(content, @"\W|[a-z]|[A-Z]|_", ""); if(text.Length < 20){ content = ""; } return content; } } 附件的切割与拼接using System; using System.Collections.Generic; using SpiderInterface; class LocoyCode{ /// <summary> /// 执行方法,不能修改类和方法名称。 /// </summary> /// <param name="content">标签内容</param> /// <param name="response">页面响应,包含了Url、原始Html等属性</param> /// <returns>返回处理后的标签内容</returns> public string Run(string content,ResponseEntry response){ //在这里编写处理代码 //string[] splitData = Regex.Split(content, "&&"); string[] splitData = content.Split(new string[] {"&&"}, StringSplitOptions.None); string[] urlArr = splitData[0].Split('|'); string[] nameArr = splitData[1].Split('|'); string result = ""; for(int i = 0; i<urlArr.Length; i++){ result += "<a href=\"" + urlArr[i] + "\">" + nameArr[i] +"</a>"; } return result; } } C#解决附件需要分隔然后在拼接的问题using System; using System.Collections.Generic; using SpiderInterface; class LocoyCode{ /// <summary> /// 执行方法,不能修改类和方法名称。 /// </summary> /// <param name="content">标签内容</param> /// <param name="response">页面响应,包含了Url、原始Html等属性</param> /// <returns>返回处理后的标签内容</returns> public string Run(string content,ResponseEntry response){ //在这里编写处理代码 string result=""; string[] list_data = content.Split(new string[] {"\n", "\t"}, StringSplitOptions.RemoveEmptyEntries); foreach(string str in list_data){ result += "<a href='"+str.Replace("./", "")+"'>附件</a>"; } return result; } } C#统一去除html臃肿代码 public static string ModifyHtml(string text) { if (string.IsNullOrEmpty(text)) { return string.Empty; } else { //office标签清除 text = Regex.Replace(text, "\\\\\"", "'", RegexOptions.IgnoreCase); text = Regex.Replace(text, "\\\\r\\\\n", "", RegexOptions.IgnoreCase); text = Regex.Replace(text, "\\\\r", "", RegexOptions.IgnoreCase); text = Regex.Replace(text, "\\\\n", "", RegexOptions.IgnoreCase); text = Regex.Replace(text, "\\\\t", "", RegexOptions.IgnoreCase); text = Regex.Replace(text, "null", "", RegexOptions.IgnoreCase); text = Regex.Replace(text, "<divider[^>]*?>", "", RegexOptions.IgnoreCase); text = Regex.Replace(text, "</divider[^>]*?>", "", RegexOptions.IgnoreCase); text = Regex.Replace(text, "<iframe[^>]*?>", "", RegexOptions.IgnoreCase); text = Regex.Replace(text, "</iframe[^>]*?>", "", RegexOptions.IgnoreCase); text = Regex.Replace(text, @"[""'‘’”“]", "'", RegexOptions.IgnoreCase); text = Regex.Replace(text, @"<!--[if[\S\s]+?<!\[endif\]-->", "", RegexOptions.IgnoreCase); text = Regex.Replace(text, @"<o:p></o:p>", "", RegexOptions.IgnoreCase); text = Regex.Replace(text, @"<style[^>]*?>[\s\S]*?</style>", "", RegexOptions.IgnoreCase); text = Regex.Replace(text, @"<script[^>]*?>[\s\S]*?</script>", "", RegexOptions.IgnoreCase); text = Regex.Replace(text, @"<p[^>]*?>", "<p>", RegexOptions.IgnoreCase); text = Regex.Replace(text, @"<table[^>]*?>", "<table>", RegexOptions.IgnoreCase); text = Regex.Replace(text, @"<tr[^>]*?>", "<tr>", RegexOptions.IgnoreCase); text = Regex.Replace(text, @"<ul[^>]*?>", "<ul>", RegexOptions.IgnoreCase); text = Regex.Replace(text, @"<li[^>]*?>", "<li>", RegexOptions.IgnoreCase); text = Regex.Replace(text, @"<!DOCTYPE[^>]*?>", "", RegexOptions.IgnoreCase); text = Regex.Replace(text, @"<html[^>]*?>", "", RegexOptions.IgnoreCase); text = Regex.Replace(text, @"</html[^>]*?>", "", RegexOptions.IgnoreCase); text = Regex.Replace(text, @"<meta[^>]*?>", "", RegexOptions.IgnoreCase); text = Regex.Replace(text, @"<head[^>]*?>[\s\S]*?</head>", "", RegexOptions.IgnoreCase); text = Regex.Replace(text, @"<body[^>]*?>", "", RegexOptions.IgnoreCase); text = Regex.Replace(text, @"</body[^>]*?>", "", RegexOptions.IgnoreCase); text = Regex.Replace(text, @"<form[^>]*?>", "", RegexOptions.IgnoreCase); text = Regex.Replace(text, @"</form[^>]*?>", "", RegexOptions.IgnoreCase); text = Regex.Replace(text, @"<textarea[^>]*?>", "", RegexOptions.IgnoreCase); text = Regex.Replace(text, @"</textarea[^>]*?>", "", RegexOptions.IgnoreCase); text = Regex.Replace(text, @"( ){3,}", " ", RegexOptions.IgnoreCase); text = Regex.Replace(text, @"\{['""][^\}]*?['""]\}", "", RegexOptions.IgnoreCase); text = Regex.Replace(text, @"<link[^>]*?>", "", RegexOptions.IgnoreCase); //text = Regex.Replace(text, @"<img[^>]*?>", "", RegexOptions.IgnoreCase);//有些事内容是图片 text = Regex.Replace(text, @"<rect[^>]*?>", "", RegexOptions.IgnoreCase); //text = Regex.Replace(text, @"<input[^>]*>", "", RegexOptions.IgnoreCase); text = Regex.Replace(text, @"<!--([\s\S]*?)-->", "", RegexOptions.IgnoreCase); text = Regex.Replace(text, @"style=['""]([\s\S]*?)['""]", "", RegexOptions.IgnoreCase); text = Regex.Replace(text, @"class=['""]([\s\S]*?)['""]", "", RegexOptions.IgnoreCase); text = Regex.Replace(text, @"<strong[^>]*?>", "", RegexOptions.IgnoreCase); text = Regex.Replace(text, @"</strong>", "", RegexOptions.IgnoreCase); //text = Regex.Replace(text, @"<[/]?h[1-6][^>]*?>", "", RegexOptions.IgnoreCase);//有些信息用它来换行 text = Regex.Replace(text, @"<div[^>]*?>", "<div>", RegexOptions.IgnoreCase); text = Regex.Replace(text, @"<font[^>]*?>", "", RegexOptions.IgnoreCase); text = Regex.Replace(text, @"</font>", "", RegexOptions.IgnoreCase); text = Regex.Replace(text, @"<canvas[^>]*?>", "", RegexOptions.IgnoreCase); text = Regex.Replace(text, @"</canvas>", "", RegexOptions.IgnoreCase); text = Regex.Replace(text, @"<span[^>]*?>", "<span>", RegexOptions.IgnoreCase); text = Regex.Replace(text, @"<label[^>]*?>", "<label>", RegexOptions.IgnoreCase); text = Regex.Replace(text, @"<!-[^>]*?>", "", RegexOptions.IgnoreCase); text = Regex.Replace(text, @"<[/]?h[1-9][^>]*?>", "", RegexOptions.IgnoreCase); text = Regex.Replace(text, @"<img[\s\S]*?src=['""]data: image[^>] *?> ", "", RegexOptions.IgnoreCase);//清除base64图片 //只能放在最后 text = Regex.Replace(text, @"<p[^>]*?><br[^>]*?/></p[^>]*?>", "", RegexOptions.IgnoreCase); text = Regex.Replace(text, @"(\r\n){2,}", "\r\n", RegexOptions.IgnoreCase); text = Regex.Replace(text, @"(\r)", "", RegexOptions.IgnoreCase); text = Regex.Replace(text, @"(\n)", "", RegexOptions.IgnoreCase); text = Regex.Replace(text, @"(\t)", "", RegexOptions.IgnoreCase);//空格 text = Regex.Replace(text, @"(<br/>){2,}", "<br />", RegexOptions.IgnoreCase); text = Regex.Replace(text, @"(<br>){2,}", "<br />", RegexOptions.IgnoreCase); text = Regex.Replace(text, @"(<br />){2,}", "<br />", RegexOptions.IgnoreCase); text = Regex.Replace(text, @"(\s){2,}", " ", RegexOptions.IgnoreCase); if (!string.IsNullOrWhiteSpace(text)) { text = FilterInputHtml(text); } text = text.Trim(); return text; } }
-
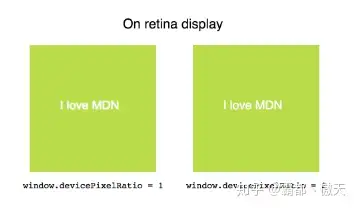
JS的10种浏览器操作系统属性检测 JS的10种浏览器操作系统属性检测网址:https://zhuanlan.zhihu.com/p/67923680这些属性不仅包含浏览器的信息,同时还有操作系统,计算机硬件等信息(虽然不多)。我决定写篇文章记录并分享给大家,每一种属性的检测我都贴了一个jsbin链接,because talk is easy,show me code! userAgent navigator.userAgent 这估计是最常见的浏览器属性检测方式了,可以大概得知浏览器种类以及版本号(虽然不是100%准确)JS Bin 用户浏览器的默认语言(英语还是中文等等) navigator.language || navigator.userLanguage || navigator.browserLanguage || navigator.systemLanguage 根据用户语言的不同给予合适的操作。比如 en的用户就加载一些国外的免费web服务(例如什么查询IP,共享评论等),zh-cn的用户因为墙的原因,可以关闭这些服务。JS Bin 指明当前浏览器环境所拥有的CPU核心数 navigator.hardwareConcurrency 貌似用处不大 _ JS Bin 分辨率与可用区域分辨率 console.log(`分辨率与可用屏幕区域 分辨率${window.screen.width} x ${window.screen.height} 可用区域 ${window.screen.availWidth} x ${window.screen.availHeight} `); 你会发现屏幕分辨率与可用区域分辨率很可能不一样,这是因为用户的桌面下方往往是操作系统的导航栏。所以浏览器可用的区域就减少了呀。而且即使你把浏览器设置全屏,依然是可能不同的。而且如果你的电脑有俩个显示器,你可以试试浏览器网页在不同的显示器上面得到的结果是不一样的。jsbin 获取用户的时区 if (window.Intl && window.Intl.DateTimeFormat) { return new window.Intl.DateTimeFormat().resolvedOptions().timeZone } else { return null; } Intl对象是 ECMAScript 国际化 API 的一个命名空间,它提供了精确的字符串对比、数字格式化,和日期时间格式化。更多信息参考MDNjsbin 物理像素与CSS像素的比值 window.devicePixelRatio 此属性返回当前显示设备的物理像素分辨率与CSS像素分辨率的比值。该值也可以被解释为像素大小的比例:即一个CSS像素的大小相对于一个物理像素的大小的比值。这个属性是有作用的,对于retina高分辨率屏幕,设置此值=2可以解决canvas文字模糊的问题,点击MDN获取更多信息 检查浏览器是否安装了AdBlock 插件 var isExistADBlock = function() { var ads = document.createElement('div') ads.innerHTML = ' ' ads.className = 'adsbox' var result = false try { // body may not exist, that's why we need try/catch document.body.appendChild(ads) result = document.getElementsByClassName('adsbox')[0].offsetHeight === 0 document.body.removeChild(ads) } catch (e) { result = false } return result } 检查的原理:设置一个class为adsbox的元素并添加到document.body中,adBlock插件会将这个class的元素隐藏,所以以此可以检测用户是否安装了反广告插件。jsbin 演示 检测网页是否被自动化测试工具控制 function checkIfControlledByAutomation() { return !!navigator.webdriver; } 自动化测试工具非常有名的俩个框架: GoogleChrome团队的puppeteer自动化测试框架&& selenium。它的原理很简单:自动化测试框架控制网页时候调用了浏览器的控制API,浏览器是知道自己被自动化控制了,并且浏览器设置navigator.webdriver = true来告知网页现在正在被模拟。 有的网站无法通过自动化测试框架爬取数据就是因为检测了该值。下图是Chrome被puppeteer控制的示例。(除IE之外的所有主流浏览器都支持该属性)Chrome被puppeteer控制后,navigator.webdriver返回true 用户设备是否支持手指触摸、最大触摸点数 function getMaxtouchPoints() { let maxTouchPoints = 0; if (typeof navigator.maxTouchPoints !== 'undefined') { maxTouchPoints = navigator.maxTouchPoints } else if (typeof navigator.msMaxTouchPoints !== 'undefined') { maxTouchPoints = navigator.msMaxTouchPoints } return maxTouchPoints; } 这个检测最大作用就是检测用户的设备是否支持手指触摸我们看一下手机上面运行的截图 jsbin地址 canvas指纹 好了到了我最想介绍的话题了,本篇文章的主题。什么是canvas指纹?canvas指纹理论上可以唯一标识一个浏览器,即使用户删除了浏览器的任何隐私记录(例如cookie,localStorage,indexedDB等等),这个值在每次生成的时候都依然是相同的。那么有什么用?搜索引擎可以根据这个值跟踪某个人的行为与习惯。即使你每次以隐身模式访问baidu,百度依然可以确定每次访问是不是你,然后给你定向地推送广告。(额 (⊙o⊙)…有点难受)它的工作原理是什么?用JS创建一个canvas画布,然后在画布上面画几个图形,正方形,圆形等,然后写几个字。然后把这个canvas base64编码,最后生成base64编码的hash值,这个hash值就是canvas指纹。(hash算法可以使用非常主流的md5算法)。为什么这个hash值能够唯一标识一个浏览器呢?那是因为这个hash值本质上是浏览器+操作系统+GPU+图形驱动器的唯一性,任何俩个不相同的浏览器,或者不同电脑上面的相同浏览器 都会存在细丝末毫的不同,而这个不同会导致浏览器绘制的图像肉眼看起来相同,但是某几个像素点可能存在几个像素的偏移或者灰度偏移,然后生成的hash值就完全不一样了。 这里给出wikipedia的链接那么它是百分百准确的吗?不是! 在我们测试过程中发现,这个指纹在最新的Chrome浏览器上(version74)显示都是相同的了,或者说相同几率很高。很可能Google Chrome团队已经解决底层操作系统与硬件差异带来的这个问题了。但是这项技术依然被广泛采用,因为根据这项技术衍生的技术还有 audio指纹,webgl指纹,fonts字体指纹。这些技术的组合叫做浏览器指纹。Oh my god, so 百度还是能知道每次访问是不是我!是滴,很难受。。。说了这么多,show me the code ! (额,代码比较长,这里直接给出jsbin的链接吧)关于audio,webgl,canvas 等指纹的更多信息可以访问我写的一个Github Demo,有在线演示的小栗子哦。参考链接 https://**en.wikipedia.org/wiki/C**anvas_fingerprinting https://**github.com/Valve/finger**printjs2 https://**amiunique.org/** 检测自己是否全球唯一的网站 https://**chrome.google.com/webst**ore/detail/canvas-fingerprint-defend/lanfdkkpgfjfdikkncbnojekcppdebfp?hl=en 防止网站获取用户真实的canvas指纹插件(Chrome平台,其它平台也有)(感兴趣可以了解一下其工作原理)
-
curl_cffi: 支持原生模拟浏览器 TLSJA3 指纹的 Python 库 curl_cffi: 支持原生模拟浏览器 TLSJA3 指纹的 Python 库越来越多的网站开始使用 TLS 指纹反爬虫,而 Python 中竟然没有任何方法解决这个问题。前一阵 看到由国外大神写了一个 curl-impersonate 命令行工具,可以完美模拟主流浏览器的指纹,遂用 cffi 封装成了 Python 库 curl_cffi,这样就可以 继续愉快地写爬虫啦!TLS 指纹首先来回顾一下什么是 TLS 指纹。如果已经了解,可以直接跳到后边的 curl_cffi 部分。现在绝大多数的网站都已经使用了 HTTPS,要建立 HTTPS 链接,服务器和客户端之间首先要进行 TLS 握手,在握手过程中交换双方支持的 TLS 版本,加密算法等信息。不同的客户端之间的差异 很大,而且一般这些信息还都是稳定的,所以服务端就可以根据 TLS 的握手信息来作为特征,识别 一个请求是普通的用户浏览器访问,还是来自 Python 脚本等的自动化访问。JA3 是生成 TLS 指纹的一个常用算法。它的工作原理也很简单,大概就是把以上特征拼接并求 md5。有证据表明,阿里云、华为云、Akamai 和 Cloudflare 都在使用 TLS 指纹技术来识别机器访问流量。 Akamai 更是直接在宣传稿中说明了在通过 TLS 指纹技术检测非法请求。在真正发现 Cipher Stunting 之前,Akamai 观察到的 TLS 指纹大概有数万个。在初步发现后不久, TLS 指纹数量激增至数百万,最近跃升至数十亿。 https://www.**akamai.com/blog/securit**y/bots-tampering-with-tls-to-avoid-detection查看 tls 指纹的网站有: https://**tls.browserleaks.com/js**on https://**tls.peet.ws/** https://**kawayiyi.com/tls** 不同网站的生成的指纹可能有差异,但是多次访问同一个网站生成的指纹是稳定的,而且能区分开 不同客户端。下文以第一个网站为例。浏览器的指纹:53ff64ddf993ca882b70e1c82af5da49browser ja3httpx 的指纹:44423a0e34badcd72364f09ff481fcc9Python 3.10.9 (main, Jan 11 2023, 15:21:40) [GCC 11.2.0] on linux Type "help", "copyright", "credits" or "license" for more information. >>> import httpx >>> r = httpx.get("https://tls.browserleaks.com/json") >>> r.json() {'ja3_hash': '44423a0e34badcd72364f09ff481fcc9', 'ja3_text': '772,4866 curl 的指纹:0ef95c8302480557fbc3cd8a7c87973c$ curl --version curl 7.81.0 (x86_64-pc-linux-gnu) libcurl/7.81.0 OpenSSL/3.0.2 zlib/1.2.11 brotli/1.0.9 zstd/1.4.8 libidn2/2.3.2 libpsl/0.21.0 (+libidn2/2.3.2) libssh/0.9.6/openssl/zlib nghttp2/1.43.0 librtmp/2.3 OpenLDAP/2.5.11 Release-Date: 2022-01-05 Protocols: dict file ftp ftps gopher gophers http https imap imaps ldap ldaps mqtt pop3 pop3s rtmp rtsp scp sftp smb smbs smtp smtps telnet tftp Features: alt-svc AsynchDNS brotli GSS-API HSTS HTTP2 HTTPS-proxy IDN IPv6 Kerberos Largefile libz NTLM NTLM_WB PSL SPNEGO SSL TLS-SRP UnixSockets zstd $ curl https://tls.browserleaks.com/json {"ja3_hash":"0ef95c8302480557fbc3cd8a7c87973c","ja3_text":"772,4866-4867-4865 可以看到,每个客户端的指纹都是不一致的,服务端也就可以据此防御异常流量。显然,防御等级分 两个层次。非法指纹黑名单这个思路很直接,把常用的爬虫工具的指纹收集起来,然后全都屏蔽了就好了。比如说:curl, requests, golang 访问时,直接 403。当然,突破也很简单,别用默认的指纹,直接随便改一下 tls hello 包的值就行了。比如,修改 httpx 的 TLS 协议。以 httpx 为例:# 默认 cipher 在这里定义:https://github.com/encode/httpx/blob/master/httpx/_config.py import ssl import httpx # create an ssl context ssl_context = ssl.SSLContext(protocol=ssl.PROTOCOL_TLS) CIPHERS = 'ECDH+AESGCM:ECDH+CHACHA20:DH+AESGCM:DH+CHACHA20:ECDH+AES256:DH+AES256:ECDH+AES128:DH+AES:ECDH+HIGH:DH+HIGH:RSA+AESGCM:RSA+AES:RSA+HIGH' ssl_context.set_ciphers(CIPHERS) r = httpx.get('https://tls.browserleaks.com/json', verify=ssl_context) print(r.json()) # {'ja3_hash': 'cc8fc04d55d8c9c318409384eee468b6' 可以看到 JA3 指纹已经变了。合法指纹白名单既然指纹可以随便改,那就直接只认常用浏览器的指纹好了。这时候如果爬虫或者其他脚本再想要 突破防御,需要把每一个值都改成和浏览器都完全相同,难度还是挺大的。尤其是考虑到大多数 语言的标准库都是直接使用系统的 SSL 库,很多底层的东西直接没提供接口,所以这种防御还是非常 有效的。例如,Python 使用了 OpenSSL,而 Chrome 则使用了 BoringSSL,这两者的细节差异很多。所以, 纯 Python 的库,比如 requests 和 httpx,再怎么改也不可能改成和 Chrome 一样的指纹,必须 使用第三方的 C 扩展库,才能够实现完美模拟浏览器指纹。此外,还又一个小细节,可以由 TLS 指纹反推出客户端是从哪些操作系统或者软件来的,如果和 User-Agent 互相矛盾,那也说明有问题。不过实际中,我还没有遇到这种情况。curl_cffi为了完美模拟浏览器,国外有大佬给 curl 打了一些 patch,把相应组件全部都替换成了浏览器使用 库,连版本都保持一致,这样就得到了和浏览器完全一样的指纹,这个库是:curl-impersonatePython 中早就有 curl 的 binding -- pycurl,但是非常难用,安装的时候总是出现编译错误;接口 也很低级,相比 requests,甚至 urllib,用起来都比较费劲。curl-impersonate 的作者提出使用 环境变量 + 替换 libcurl 来在不同语言中使用 curl-impersonate,但是似乎 pycurl 没法工作。 于是乎,我直接另起炉灶,写了一个 curl(-impersonate) 的 Python binding.相比 pycurl,有以下优点: 原生支持 curl-impersonate pip install 直接是二进制包,无需编译,也就不会有编译错误 提供了一个简单的 requests-like 接口 废话少说,看代码吧!pip install curl_cffi 使用起来也很简单from curl_cffi import requests # 注意这个 impersonate 参数,指定了模拟哪个浏览器 r = requests.get("https://tls.browserleaks.com/json", impersonate="chrome101") print(r.json()) # output: {'ja3_hash': '53ff64ddf993ca882b70e1c82af5da49' 我们可以看到,输出的 JA3 指纹和浏览器中的指纹一模一样!代理也支持:>>> proxies={"http": "http://localhost:7777", "https": "http://localhost:7777"} >>> r = requests.get("http://baidu.com", proxies=proxies, allow_redirects=False, impersonate="chrome101" ) >>> r.text '<html>\r\n<head><title>302 Found</title></head>\r\n<body bgcolor="white">\r\n<center><h1>302 Found</h1></center>\r\n<hr><center>bfe/1.0.8.18</center>\r\n</body>\r\n</html>\r\n' >>> r = requests.get("https://tls.browserleaks.com/json", proxies=proxies, impersonate="chrome101" ) >>> r.json() {'ja3_hash': '53ff64ddf993ca882b70e1c82af5da49' 同样的功能,也可以用底层一点的 Curl 对象:from curl_cffi import Curl, CurlOpt from io import BytesIO buffer = BytesIO() c = Curl() c.setopt(CurlOpt.URL, b'https://tls.browserleaks.com/json') c.setopt(CurlOpt.WRITEDATA, buffer) c.impersonate("chrome101") c.perform() c.close() body = buffer.getvalue() print(body.decode()) 仓库在这里:https://**github.com/yifeikong/cu**rl_cffi其他指纹技术概览 HTTP Header 指纹。通过浏览器发送的 header 的顺序和值的组合来判断是合法用户还是爬虫 DNS 指纹。参考:http://**dnscookie.com** 浏览器指纹。通过 canvas,webgl 等计算得到一个唯一指纹,Cookie 禁用时监视用户的主流技术 TCP 指纹。也是根据 TCP 的一些窗口、拥塞控制等参数嗅探、猜测用户的系统版本 总结一下,指纹技术就是通过不同的设备和客户端在参数上的微妙差异来识别用户。本来按照规范, 这些值都是应该任意选取的,但是,现实世界中,服务端反而对不同值采取了区别对待。指纹技术 可以说应用到了 OSI 网络模型中所有可能的层,基于 HTTP header 顺序的指纹工作在第七层应用层, SSL/TLS 指纹工作在传输层和应用层之间,TCP 指纹在第四层传输层。而在 TCP 之下的 IP 层和物理 层,因为建立的不是端到端的链路,所以只能收集上一跳的指纹,没有任何意义。对于爬虫来说,User-Agent 相当于自报门户。除了初学者以外,没有人会顶着 Python/3.9 requests 这样的 UA 去爬的,而指纹则是很难更改的内部特征。通过指纹技术可以防御一大批爬虫,而使用 能够模拟指纹的 http client 则轻松突破这道防线。对于普通用户来说,各种指纹造成了极大的隐私泄露风险。即使按照 GDPR 等监管政策的要求,用户拒绝使用 Cookie 时,互联网公司依然可以通过各种指纹来定位追踪用户,乃至于区别对待。平等、 匿名、自由地使用个人数据和公开数据应该是一项基本人权。在立法赶不上技术更新的时代,我们应该用技术手段捍卫自己的权利。2024 更新项目发布快一年了,总有人来问为什么还是被 Cloudflare 5s 盾了呀。我只能说,TLS/JA3 指纹只是人家防御的一部份,虽然很重要,但不是全部。建议搜索 cf_clearance 相关开源项目,或者使用专业的商业服务,如 YesCaptcha 等。